YM-Panel
So much has changed...
I leave the old "document" as it is, since it describes some of the history - and other parts are still relevant and I don't need to repeat/update that.
Under this section I'll put all stuff that comes in addition to everything said in "YM-Conversion I".
Obviously, now when YM-files are selected for conversion a new panel pops up. Here I will describe what you can do with that!
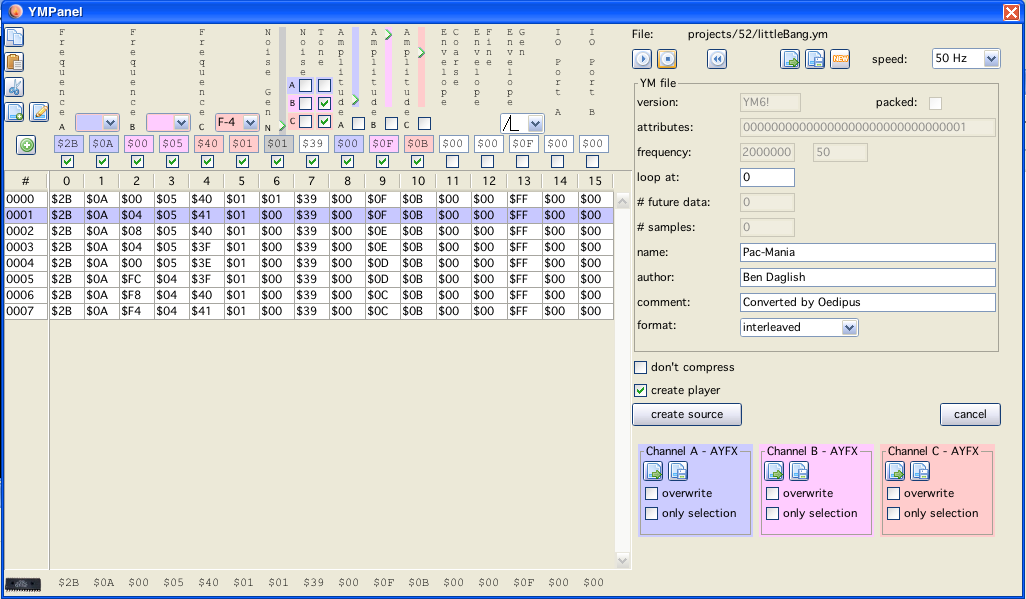
YM-Panel
In general the panel is split into different sections (which again can be devided in several clusters).
The right side of the window is mainly occupied by a table. That table keeps all rows of YM-Data which is available at a given time.
The rows in the table can have different colors:
white
nothing special - just data
lavender (sort of color)
that is the current "active" row, the data of that row is displayed at the top, this data can be edited by the ym-gui, playing ym- data advances this 50 times per second. By double clicking on a row, you can set it.
gray
these are rows that are selected (by dragging the mouse over rows)
To the top of the table you see different "Editors" for volume, noise, notes etc. With these controls you can manipulate register entries of the YM-Data.
Note:
With these controls you edit the YM-Data, not the PSG registers!
Below each control you can see (sometimes colored) textfields. The textfields show you the same data as the above controls. You can also edit the values in numerical form via these textfields.
Note:
A double click on a textfield sends the data to the PSG-emulator of the YM-Panel!
Note:
A SHIFT double click on a textfield sets the current data to the complete column.
Below the textfields you see a checkbox for each of the registers. These checkboxes enable/disable the denoted registers, enables/disables means:
the YM-Player recognizes the switches and plays only the channels which are enabled
the source code generator of the ym-panel also recognizes the switches and only data (and the player) is generated for the selected registers
The 3 additional buttons "1<>2", "2<>3" and "3<>1" switch complete channel data within the PSG (including frequency, amplitude and enable settings).
As you can see the channel specific data words/bytes/bits are colored consistently for each of the three available channels.
At the bottom of the page you can see the actual registers the PSG emulation for the YM-panel at any given time are set to. These can not directly be edited or altered.
On the top there are a couple of special buttons, here a short description:
 insert new row
This button inserts a new row (with 0-lled data) befor the current active row
 copy selected rows
Put the current selected rows in a YM-Buffer (this is no clipboard buffer, but can be accessed from all YM-panels which are open)
 paste buffer
Paste the current buffer befor the current active row. The pasted rows are inserted, they do not overwrite existing rows!
 cut selected rows
The current selected rows are deleted, but also placed in the buffer
 insert ym file
Insert another YM-file befor the current active row.
 save selection as ym file
Save the current selected rows as a YM-file.
 insert ascii value file
Add ascii "source" ym data from a source file.
Last data must have a "pure" form like:
$50, $00, $F0, $00, $40, $00, $18, $31, $00, $02, $02, $00, $00, $00
$50, $00, $F0, $00, $80, $00, $18, $31, $00, $02, $04, $00, $00, $00
$50, $00, $F0, $00, $B0, $00, $18, $31, $02, $01, $04, $00, $00, $00
The left side of the window belongs mainly to the YM-Player.
At the top row there are several buttons:
 play current ym-data
The data that is shown to the left is played (and looped)
 stop playing
Yeah, really, stop it!
 rewind
Set current active YM-data row to 0.
 load YM-file
Load a YM-file, all current data is overwritten.
 save YM-file
Save the complete current data to a YM-file.
 new YM-file
Deletes all data, creates a new "empty" YM-data table (with ONE row of nulled data)
Further
you can select (only two settings at the time), if you would like to play back in 50 or 60 Hz.
Below the player buttons, you can see listed the meta-data that was gathered from the loaded YM-file. Not all YM-versions supply all data fields, so some may be empty.
Below the YM-file information you see two buttons and two checkboxes, with those you can influence (or start) the generation of source files. They are pretty self explainatory, see also the sub chapter on "YM vectrex generator"
There is a tab called "Lister". Within that tab you see a listing of all ym files that were in the directory your last ym file was loaded from.
Double clicking an entry loads the ym file.
more configuration
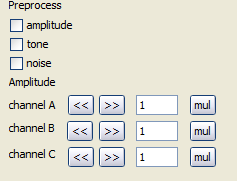
PreProcess
If switched on the ym data will be preprocessed. Meaning values will be changed to represent the state of the according enable registers. E.g. if channel one is disabled, that the accordings frequency and amplitude registers are set to "0" (zero).
Some files pack better with preprocessing, some worse. Here only trials can figure out the best settings
Amplitude
The "<<" and ">>" button shift the amplitude of the corresponding channel 1 bit (double or half the value). The "mul" in the same line allows the multiplication of the amplitude with a "double" (result are 4 bit integers again).
Force Channel
Only relevant for streamed output.
Streamed output examines the ym data and leaves out registers that do not change at all. With these checkboxes you can force streamed output even for registers that do not change at all.
The last available feature is support for AYFX files (see the other chapter where these may come from). AYFX is a format for sound effects of the PSG-chips. The sound effects are channel independend, and are saved WITHOUT channel information (and can be loaded to any channel - any of the three :-)). The below description goes for all three channels.
You can save either one complete channel or the current selected rows of one channel as an AYFX file.
You can load AYFX data to the current YM-file. You can select if new rows should be inserted [befor the current active row] (than all other channel data will be set to 0 (null)), or you can select if the data in the current YM-file should overwritten with AYFX data [starting from the current active row]. Data for the selected channel will be overwritten. Mixer settings for that channel only will also be changed (but the other channel data in Reg 7 will be kept unchanged). The noise register (Reg 6) will be changed to the data that is loaded from the AYFX file (there is only one noise register for all 3 channels, so this may make a difference!)